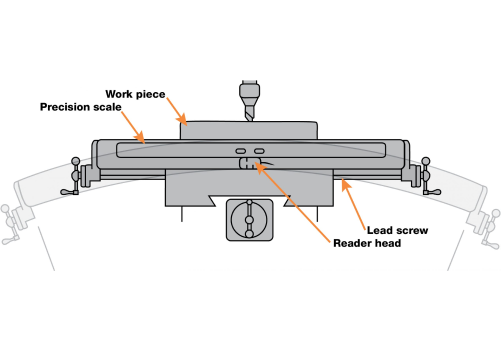
SCHAUMBURG, IL — It is common knowledge that all machine tools — new and old — contain some error in the accuracy of moving components when compared to a standard that is known to be true. This area of concern is important enough for you to learn more about these errors and why they occur.
In every machining operation, there is always some degree of error or inaccuracy due to at least one of the following machine tool deficiencies:
- Gravity causes deflections in the machine tool structure, particularly when a heavy workpiece is placed on a machine with overhanging table or ways. A result of these deflections is called Abbe error. (The following paragraphs provide further explanation.)
- The fit between mating surfaces is loose, because of manufacturing tolerances, subsequent wear or improper gib adjustment.
- The ways are not scraped straight or are not aligned perfectly at assembly.
- Driving and cutting forces cause deflections, since no material is totally rigid.
- Temperature variations can distort machine geometry.
In addition, machine tables and ways can be forced out of alignment if you use the locks improperly. Tables that are not completely locked in position will shift from the forces of machining and eventually wear.
Abbe error (also called machine geometry or transfer error) is a progressive fault occurring mainly in machine tool tables or beds. It occurs in other moving parts also, but we’ll limit our discussion here to mill tables. Gibs and table ways can wear due to an increase in pressure at the edge of the machine way, on both the knee and center of the table. This causes increased wear at these points as the center of gravity of the table moves with an increasing overhang.
The shift of weight is gradual as the table moves from the center; therefore, the wear is also gradual. The result is the formation of an arc shape along the table and knee, concave to the ways. Pressure of the gib against the way causes the gib to wear. Often when a short travel is used, retightening the gib causes localized wear of the way.
The scale attached to the table measures its horizontal motion with respect to the fixed reading head. A worn table, however, follows the curvature of the arc, resulting in an error in the movement of the workpiece relative to the cutter. In the case of the milling machine, the workpiece is moving too far.
Acu-Rite Solutions readout systems include automatic linear error calculation and stored error compensation factors in all systems as a standard feature. Both linear and non-linear error compensation can be entered into the readout. Error compensation corrections of up to ±99999 ppm (parts per million) can be entered.