The easiest way to install a DRO system on a machine
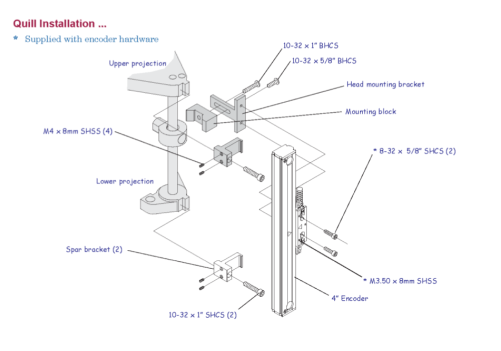
If you’ve ever retrofitted a Bridgeport, with a new digital readout (DRO) system, you know the care it requires. But, you probably also realize the value a DRO paired with a capable encoder can add to a manual or legacy mill, lathe or grinder; adding a precision encoder and readout dramatically increases the speed of processes and improves the chances of getting parts done right the first time. However, an issue often arises when it comes to installation. While nearly every machine ever built could benefit from a DRO, nearly every machine also has different bolt hole patters, coolant drains, travels, the list goes on and on. In most cases, this means the addition of a DRO will require careful measuring and the tapping and/or drilling of some sort of universal, generic bracket. This can be painstaking—and again, if you have different brands or types of machines, you’ll have to modify brackets for each. The easiest way to install a DRO system on a machine is to use custom brackets. This can save upwards of an hour for each machine being upgraded or retrofitted. We pride ourselves on not only setting the standard for DRO system quality and performance, but also our bracketing. We make custom DRO and encoder bracketing kits for more than 100 different machine makes and models, from manual mills to lathes. No measuring. No drilling. Everything lines up flush and fast. Step-by-step instructions guide you through the process of installation using hand-picked components for your specific machine. It’s easier than putting a piece of furniture together from the department store. Here is a sample instruction page for installing an encoder on a Bridgeport Series 1: This simple custom process makes realizing ROI faster and easier. How fast, you ask? Use our simple ROI calculator tool to find out in just a few clicks. Or, if you’re still a little unsure about how to find more efficiency with a DRO, check out our Ultimate Guide to DROs.


